MODERN ADMINISTRATION CRASH COURSE - 3
8/7/2025
Prior posts in the series were mainly concerned with Proxmox, reproducible infrastructure deployments, and reliably collecting network information from the said infrastructure. Moving forward, we'll focus on hooking Ansible into Terraform to enable the configuration of the deployed virtual machines.
The last thing we did was output the collected IP addresses to console for validation. Now we want to actually utilize these values within Terraform. To facilitate this, let's add the following to variables.tf:
locals {
  ip_addresses = jsondecode(data.local_file.ip_info.content)
}
A local value allows you to assign a name to an expression. These differ from variable declarations as values cannot be dynamically passed to them. Here, we declare a local value to contain the decoded IP information we'll be referencing in multiple locations.
Moving forward, outputs.tf can be updated to reference ip_addresses:
output "windows_2025_dc_ip_addresses" {
  value = local.ip_addresses
}
Soon, we'll reference this a second time in a configuration file for the purpose of passing this information to Ansible. Before that though, let's actually set up Ansible. I choose to place all of my Ansible related files under a new configuration/ directory. To make sure all of our ansible files stay contained within this directory, we'll first author our ansible.cfg file. The purpose of having an ansible.cfg file is to specify settings that affect Ansible's behavior.
Note: Ansible will prioritize the ansible.cfg in the current working directory over the global and user configuration file.**
[defaults]
collections_path = ./collections
roles_path = ./roles
inventory = ./terraform.yml
host_key_checking = false

[ssh_connection]
ssh_args = -o StrictHostKeyChecking=no -o UserKnownHostsFile=/dev/null
Collections are installable bits of content such as playbooks, modules, plugins, and roles. Roles are just reusable units of Ansible automation. If we do not specify an installation path for these, then they will default to being installed under ~/.ansible/.
The inventory field is set terraform.yml, a file yet to be created. Inventory files specify which hosts will be managed by Ansible. We won't be using a normal inventory file, but here's an example of what a basic one would look like:
ungrouped:
  hosts:
    mail.example.com:

webservers:
  hosts:
    foo.example.com:
    bar.example.com:

dbservers:
  hosts:
    one.example.com:
    two.example.com:
    three.example.com:
terraform.yml essentially tells Ansible to defer to Terraform for the inventory information so we don't have to manually update it ourselves. The file only contains two lines:
plugin: cloud.terraform.terraform_provider
project_path: ../.
A plugin is specified, as well a relative path to the Terraform project. The aforementioned plugin must be installed. In the spirit of reproducibility, we'll declare all of our Ansible dependencies within requirements.yml.
collections:
  - name: cloud.terraform
All of the dependencies listed can be installed with the command: ansible-galaxy collection install -r configuration/requirements.yml.
host_key_checking is set to false in ansible.cfg for a couple of reasons. First, the mitigation it provides has little value for our use-case. Host key checking is intended to mitigate on-path attacks by mapping public keys to IP addresses. Using that, SSH clients can issue a warning when attempting to connect to a known remote host which has an unfamiliar public key. Ansible will be connecting to infrastructure deployed a few minutes prior; it's very unlikely the associated IP addresses or routes could be compromised.
The second reason is related to why I've opted to use password authentication instead of keys/certificates. Everything done so far has been in service of quickly bootstrapping a domain. Once the domain is up, the local administrator account will be disabled and we'll move on to using Active Directory based authentication where applicable. The credentials used to authenticate to the virtual machine for now are disposable.
At this point, Ansible is configured to read inventory information from Terraform. Now Terraform must be configured to expose that information to Ansible using the ansible/ansible provider. To use it, it'll need to be added to versons.tf:
terraform {
  required_providers {
    proxmox = {
      source  = "bpg/proxmox"
      version = "0.76.0"
    }
    ansible = {
      version = "~> 1.3.0"
      source  = "ansible/ansible"
    }
  }
}
Looking at the documentation, we can see four resources are offered by the provider: Ansible hosts, groups, playbooks, and vaults. For now we'll just focus on declaring our hosts. Let's create a new Terraform file back in the root of our project directory, ansible_provisioning.tf:
resource "ansible_host" "windows_2025_dc" {
  count = 2
  name  = proxmox_virtual_environment_vm.windows_2025_dc[count.index].name

  variables = {
    ansible_host       = local.ip_addresses[count.index].ip
    ansible_user       = "Administrator"
    ansible_password   = var.windows_ssh_password
    ansible_shell_type = "powershell"
    domain             = "xs-labs.io"
    netbios            = "xslabs"
    dsrm               = var.dsrm_password
  }
}
Inventory files specify more than just the addresses or hostnames of machines, they also contain other details required for Ansible to connect to them. Anything other values which need to be passed from Terraform to Ansible can added. These other connection details such as credentials and shell type are specified under variables. Due to targeting Windows machines, ansible_shell_type must be set to powershell as Ansible defaults to bash for the shell type. After another terraform apply to update the configuration, everything should be in place for the basic operation of Ansible.
Note: The ansible-inventory --list command can be ran to view your ansible inventory. Often useful in troubleshooting.
Modules in Ansible are bits of code which are executed on remote hosts. To test Ansible's connection to the target machines, the win_ping module can be used. It's important to note that most modules accomplish their task by executing python on target machines. We did not install Python on the domain controllers (and for good reason). This means we'll have to stick with modules under the ansible.windows namespace. These are all implemented in powershell.
win_ping in the configuration/ directory can be executed via the ansible all -m win_ping command.
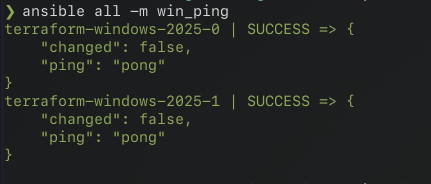
A group must be targeted when running modules from the command line. all is specified as we currently only have two machines to target. After confirming connectivity to the target machines, we can start writing the Ansible playbook.
To setup a domain with two domain controllers, you would do the following:
- Run the Install-ADDSForest powershell cmdlet on the first server to establish a new Active Directory forest. This promotes the server into a domain controller.
- Configure the first server as the DNS server for the second server.
- Run the Install-ADDSDomainController powershell cmdlet on the second domain controller. This promotes the second server into a domain controller.
- Wait 15-30m for the first replication to occur. Afterwards, for both servers, configure the preferred DNS servers to point to localhost first, and then to the other DC second.
These steps can be codified into an Ansible playbook. For those who are unfamiliar, playbooks specify a series of modules to execute to achieve a state of desired configuration on target machines. I'm going to cover these briefly one by one, appending what is covered to a new ./configuration/playbooks/domain_establishment.yml file.
Note-- Ansible uses the Jinja2 templating engine for access to variables and string interpolation, which looks like this: "{{ variable }}""
Before promoting any servers to domain controllers, let's use the ansible.windows.win_hostname module to change the hostnames on these servers. Since the module must be run on both servers, we can target all. A ternary can be used to conditionally name the servers:
- name: Change Server Hostnames
  hosts: all
  tasks:

    - name: Hostname Change
      ansible.windows.win_hostname:
        name: "{{ (inventory_hostname == hostvars[dc_0]['inventory_hostname']) | ternary('DC_0', 'DC_1') }}"
      register: result

    - name: Reboot if Required
      ansible.windows.win_reboot:
      when: result.reboot_required
The conditional statement in the name field can be read as "if the current hostname is equal to the hostname of server one, then name it DC_0, otherwise name it DC_1". There are a few special variables within the conditional.
inventory_hostname is the "inventory name for the ‘current’ host being iterated over in the play." When running a task against multiple hosts, it can be used to change the input to a module per host.
hostvars is a special variable implemented as a HashMap which can be used in Ansible playbooks to access whatever is defined in the inventory. By accessing the index of the name of a host, and then inventory_hostname, we can retrieve the inventory name of the first server.
You may have noticed the register field. Registering variables can be done to save the output of a task to a variable. It's needed in this case as the win_hostname module details that its return value specifies if the machine must be restarted afterwards.
Tasks can be conditionally executed using a when field. We can use this in conjunction with the returned result from win_hostname to restart the server if it's required.
Next we'll promote the first domain controller using the microsoft.ad.domain module, which directly corresponds to the Install-ADDSForest powershell cmdlet.
- name: DC_0 Promotion to Domain Controller | Forest Establishment
  hosts: "{{ dc_0 }}"
  tasks:

    - name: Domain Establishment
      microsoft.ad.domain:
        dns_domain_name: "{{ hostvars[dc_0]['domain'] }}"
        domain_mode: Win2025
        forest_mode: Win2025
        domain_netbios_name: "{{ hostvars[dc_0]['netbios'] }}"
        install_dns: true
        reboot: true
        safe_mode_password: "{{ hostvars[dc_0]['dsrm'] }}"
The first parameter defines the domain name, which is likely the most self-explanatory out of all of these. It'll be passed via a variable. Simple enough.
Both the domain and forest mode parameters relate to AD functional levels. These determine "available Active Directory Domain Services (AD DS) domain or forest capabilities". Servers running older versions of Windows server may not support all of the features that newer versions do. Setting a mode for a forest or domain essentially defines a minimum required version for the OS of domain controllers. We can just set this to Win2025 for both domain_mode & forest_mode as this is a fresh deployment using the latest version.
A netbios_name must also be supplied. A bit of context on what this is for the uninitiated:
NetBIOS (Network Basic Input/Output System) was originally designed by IBM in the 1980s to enable network communication across a LAN. Predating both Active Directory and DNS, NetBIOS was a crucial component in managing related machines in a "workgroup". It's a bit like a domain, except there is no central server for management of users and permissions, it's all done per machine. In these older environments, SMB played a large role. It enabled file sharing, local/networked inter-process communications, and printer sharing. Before Active Directory became prevalent, many environments were set up in this fashion.
Microsoft went on to make their own implementation of SMB called CIFS (Common Internet File System). This was effectively their version of SMB 1.0. In the early days of Windows networking, domains were heavily reliant on SMB & NetBIOS. So, NetBIOS configuration options are largely there to ensure backwards compatibility. In most environments in can and likely should be disabled to reduce attack surface.
Despite not utilizing the service, a NetBIOS name must be specified. Just make sure to make it a valid name.
Next, we must define a dsrm_password. DSRM (Directory Services Restore Mode) is akin to booting into safe mode, but for a domain controller. Booting a DC into DSRM will take the DC offline, so it will function as a regular server. This feature is intended to be used to maintenance an AD database. For example, you'd boot into DSRM to restore the database from a backup, run repair utilities such as NTDSUTIL, or mark certain objects in a database as authoritative. This will be passed as a variable as well.
Lastly, you'll almost always want your domain controllers to run the DNS service, so we'll set this to true. That covers the first play within our new playbook. The next play will promote the second domain controller into the recently established domain/forest.
- name: DC Promotion
  hosts: "{{ dc_1 }}"
  tasks:

    - name: DNS Configuration
      ansible.windows.win_dns_client:
        adapter_names: "Ethernet"
        dns_servers:
          - "{{ hostvars[dc_0]['ansible_host'] }}" # -> 192.168.X.X


    - name: Promote Server into DC
      microsoft.ad.domain_controller:
        state: "domain_controller"
        dns_domain_name: "{{ hostvars[dc_0]['domain'] }}"
        domain_mode: Win2025
        forest_mode: Win2025
        domain_netbios_name: "{{ hostvars[dc_0]['netbios'] }}"
        install_dns: true
        reboot: true
        safe_mode_password: "{{ hostvars[dc_0]['dsrm'] }}"
This play has two tasks. The first one is to configure the preferred DNS servers for targeted machine, dc_1. "Ethernet" is used to target the Ethernet interface in the adapter_names field. Subsequently, a list of IP addresses are provided to the dns_servers parameter. Our second server will need to use the first server as it's DNS server so it can resolve the name of the new domain.
Domain credentials must be supplied, and state is set to domain_controller to specify we are promoting the target host (instead of demoting it). Aside from that, all of the other parameters which the microsoft.ad.domain_controller asks for have been covered already.
I attempted to run the playbook around this point, and it continually failed to resolve the domain name. This is due to Windows Server DNS client not being very persistent in its attempts. If Windows attempts to resolve a domain name, and the first server it tries fails to resolve it, then it will not attempt to contact the secondary DNS server listed in the preferred DNS server addresses.
We did not supply an preferred IPv6 DNS server, so Windows attempts to contact the default IPv6 DNS server. Once the public DNS server informs our server it does not have records for "xs-labs.io", its accepted as a final answer. I opted to go back and modify the get_network_info.sh script to return the IPv6 addresses from the VMs so it can get passed to Ansible.
token="$1"
id="$2"
ip=""
ip6=""
cfg_file="$3"

echo "Awaiting IP for VM $id"
while [ -z "$ip" ]; do
   response=$(curl -s -k -H "Authorization: PVEAPIToken=$token" \
   "https://192.168.0.86:8006/api2/json/nodes/pve0/qemu/$id/agent/network-get-interfaces")
   ip=$(echo "$response" | jq -r '.data.result[0]."ip-addresses"[3] | select(."ip-address-type" == "ipv4") | ."ip-address"')
   ip6=$(echo "$response" | jq -r '.data.result[0]."ip-addresses"[0] | select(."ip-address-type" == "ipv6") | ."ip-address"')
   [[ ${ip:0:3} -eq 169 ]] && ip=""
   sleep 10
done

echo "Found VM $id IP: $ip"

# id_array & ip_array len should be equal
json=$(jq -n \
   --arg id "$id" \
   --arg ip "$ip"  \
   --arg ip6 "$ip6" \
   '{id: $id, ip: $ip, ip6: $ip6}')
The modifications required were thankfully minor. A ip6 variable is created to hold the IP, and by the time the script discovers the IPv4 address, the IPv6 address should also be available. Another field is added into our JSON object to accommodate for the new IP.
Now ansible_provisioning.tf can be edited to pass the IPv6 address to Ansible.
...
  variables = {
    ansible_host       = local.ip_addresses[count.index].ip
    ansible_host6      = local.ip_addresses[count.index].ip6
...
With that done "{{ hostvars[dc_0]['ansible_host6']}}" can be added to the list of DNS servers for DC_1.
As stated prior, once subsequent domain controllers are promoted, a successful replication must occur before moving on to DNS configuration. This can be accounted for by using the ansible.builtin.pause module:
- name: Prepare DC_0 for DNS Configuration
  hosts: "{{ dc_1 }}"
  tasks:

    - name: Register Command
      ansible.windows.win_shell: "ipconfig /registerdns"

    - name: Wait 15m for Replication
      ansible.builtin.pause:
        minutes: 15

    - name: Manually Pull Replication
      ansible.windows.win_shell: "repadmin /syncall /A"
Before waiting the 15m, ipconfig /registerdns is used to make sure the domain controller registers its records. A domain controller must register its DNS records with another DC before it can be reliably used as DNS server for Active Directory operations. Usually this happens automatically, but we'll do so manually here to guarantee it's done by the time repadmin is called.
After waiting the 15m, we'll call repadmin /syncall /A:
- /syncall: "Synchronizes a specified domain controller with all of its replication partners."
- /A : "Synchronizes all naming contexts that are held on the home server."
When repadmin synchronizes all partitions, this will include the DNS zones.
The Microsoft documentation states replication successes to the domain controller should be confirmed before making DNS configuration changes.
Microsoft details recommendations for DNS client settings for Domain Controllers with DNS installed. They detail three configuration options:
- Each DC uses itself as a primary DNS server. Minimizes impact on DNS queries on the network as requests are resolved as soon as they hit the first DC, but lengthy replication failures can cause zone drift.
- One DC servers as the central DNS server. This configuration is noted as being easier to troubleshoot, and will often include faster discovery on new DC locator records.
- A mix of these two. Each DC uses itself as a primary DNS server, and references other DCs as secondary servers.
The last configuration is generally considered the "meta" option which you will see in most environments. This what we will have ansible configure after waiting 15 minutes for replication:
- name: Post Domain Establishment DC_0 DNS Configuration
  hosts: "{{ dc_0 }}"
  tasks:

    - name: DNS Client Preferred Server Address Configuration
      ansible.windows.win_dns_client:
        adapter_names: "Ethernet"
        dns_servers:
          - "127.0.0.1"
          - "{{ hostvars[dc_1]['ansible_host'] }}"
          - "::1"
          - "{{ hostvars[dc_1]['ansible_host6'] }}"

- name: Post Domain Establishment DC_1 DNS Configuration
  hosts: "{{ dc_1 }}"
  tasks:

    - name: DNS Client Preferred Server Address Configuration
      ansible.windows.win_dns_client:
        adapter_names: "Ethernet"
        dns_servers:
          - "127.0.0.1"
          - "{{ hostvars[dc_0]['ansible_host'] }}"
          - "::1"
          - "{{ hostvars[dc_0]['ansible_host6'] }}"
With the addition of these last two plays, the playbook is complete. I'll go ahead and include the full playbook below for completeness:
- name: Change Server Hostnames
  hosts: all
  tasks:

    - name: Hostname Change
      ansible.windows.win_hostname:
        name: "{{ (inventory_hostname == hostvars[dc_0]['inventory_hostname']) | ternary('DC_0', 'DC_1') }}"
      register: result

    - name: Reboot if Required
      ansible.windows.win_reboot:
      when: result.reboot_required


- name: DC_0 Promotion to Domain Controller | Forest Establishment
  hosts: "{{ dc_0 }}"
  tasks:

    - name: Domain Establishment
      microsoft.ad.domain:
        dns_domain_name: "{{ hostvars[dc_0]['domain'] }}"
        domain_mode: Win2025
        forest_mode: Win2025
        domain_netbios_name: "{{ hostvars[dc_0]['netbios'] }}"
        install_dns: true
        reboot: true
        safe_mode_password: "{{ hostvars[dc_0]['dsrm'] }}"


- name: DC_1 Promotion to Domain Controller
  hosts: "{{ dc_1 }}"
  tasks:

    - name: DNS Client Preferred Server Address Configuration
      ansible.windows.win_dns_client:
        adapter_names: "Ethernet"
        dns_servers:
          - "{{ hostvars[dc_0]['ansible_host']}}"
          - "{{ hostvars[dc_0]['ansible_host6']}}"

    - name: Promote Server into DC
      microsoft.ad.domain_controller:
        state: "domain_controller"
        dns_domain_name: "{{ hostvars[dc_0]['domain'] }}"
        domain_admin_user: "Administrator@{{ hostvars[dc_0]['domain'] }}"
        domain_admin_password: "{{ hostvars[dc_0]['ansible_password'] }}"
        safe_mode_password: "{{ hostvars[dc_0]['dsrm'] }}"
        install_dns: true
        reboot: true


- name: Prepare DC_0 for DNS Configuration
  hosts: "{{ dc_1 }}"
  tasks:

    - name: Register Command
      ansible.windows.win_shell: "ipconfig /registerdns"

    - name: Wait 15m for Replication
      ansible.builtin.pause:
        minutes: 15

    - name: Manually Pull Replication
      ansible.windows.win_shell: "repadmin /syncall /A"

- name: Post Domain Establishment DC_0 DNS Configuration
  hosts: "{{ dc_0 }}"
  tasks:

    - name: DNS Client Preferred Server Address Configuration
      ansible.windows.win_dns_client:
        adapter_names: "Ethernet"
        dns_servers:
          - "127.0.0.1"
          - "{{ hostvars[dc_1]['ansible_host'] }}"
          - "::1"
          - "{{ hostvars[dc_1]['ansible_host6'] }}"

- name: Post Domain Establishment DC_1 DNS Configuration
  hosts: "{{ dc_1 }}"
  tasks:

    - name: DNS Client Preferred Server Address Configuration
      ansible.windows.win_dns_client:
        adapter_names: "Ethernet"
        dns_servers:
          - "127.0.0.1"
          - "{{ hostvars[dc_0]['ansible_host'] }}"
          - "::1"
          - "{{ hostvars[dc_0]['ansible_host6'] }}"
Since none of this is going to run within a dedicated pipeline, we can use Terraform to start the execution of the playbook and pass the required variables. To do this, we'll add a new resource to ansible_provisioning.tf, called a null resource:
resource "null_resource" "ansible_dc_promo_playbook" {
  depends_on = [ansible_host.windows_2025_dc]

  provisioner "local-exec" {
    command = <<EOF
    cd ./configuration;
    ansible-playbook ./playbooks/domain_establishment.yml \
    --extra-vars 'dc_0=${ansible_host.windows_2025_dc[0].name} dc_1=${ansible_host.windows_2025_dc[1].name}';
    EOF
  }
}
The null_resource does not define any infrastructure. It serves as a container for executing commands, and scripts. It can even execute them conditionally via the trigger parameter. As this comes from a new provider, we'll once again make an addition to versions.tf.
We'll be using the local-exec provisioner again. This time it'll be used to execute the playbook within the ./configuration directory. The command is a bit long, and is multiple lines long. We can use heredoc syntax to define a multi-line string in HCL. The <<EOF starts the string, and EOF terminates it. As for the actual commands run, we cd into the directory containing our ansible files, and then execute ansible-playbook ./playbooks/domain_establishment.yml --extra-vars followed by variables enclosed in single quotes.
Null resources should specify a trigger or a dependency to ensure they run when they are supposed to. In our case, we want it to run right after the construction of the inventory is done. This is done via the depends_on = [ansible_host.windows_2025_dc] line.
Now, this seems alright at first glance, but if you try to run this in its current state, a failure occurs. Examining the generated inventory via ansible-inventory --list, you may see that the IPs are swapped around (eg., terraform-windows-2025-1 has the IP of terraform-windows-2025-0 in the inventory).
This is due to the semi-random order in which IPs are added to ip_info.json. The IP collection script for terraform-windows-2025-0 will start first and it will usually finish first. After adding its IP the file, and then the second one will be added in the first slot. It'd look something like this:
{
  "ip_addrs": [
    {
      "id": "201",
      "ip": "192.168.0.203"
    },
    {
      "id": "200",
      "ip": "192.168.0.77"
    }
  ]
}
When jsondecode() is ran on this content in HCL, the VM with an ID of 201 will occupy index 0 in the array. This cannot be relied on however, as they execute in parallel. This dynamic output can be accounted for with conditionals in HCL.
Let's make some major revisions to our variables.tf to deal with this. Our locals definitions with the file will be redefined as so:
locals {
  ips_unchked = jsondecode(data.local_file.ip_info.content)

  name_prefix = "terraform-windows-2025-"
}

locals {
  ip_addresses = local.ips_unchked.ip_addrs[0].id == var.vm_ids[0] ? local.ips_unchked.ip_addrs : reverse(local.ips_unchked.ip_addrs)
}
First, let's decode the JSON and save it into an intermediary ips_unchked local. In another block (cannot be in the same one as locals cannot locals within the same block), we will re-define ip_addresses with a ternary conditional. The syntax for ternary conditional is as follows:
condition ? true_val : false_val
The conditional defined could be read as "if the first IP's ID is equal to the ID of the first vm, return the IPs unchanged. Otherwise, reverse the list then return it." Now they should always be in the correct order, regardless of which machine reports it's IP first.
While we're editing variables.tf, we might as well make a few more changes to parameterize our deployment.
variable "vm_ids" {
  type    = list(number)
  default = [200, 201]
}

variable "clone_id" {
  type    = number
  default = 105
}

variable "ip_info_relative_path" {
  type = string
  default = "./configuration/ip_info.json"
}

variable "cpu_cores" {
  type    = number
  default = 3
}

variable "memory" {
  type    = number
  default = 4048
}


locals {
  ip_info_path = abspath(var.ip_info_relative_path)

  ips_unchked = jsondecode(data.local_file.ip_info.content)

  name_prefix = "terraform-windows-2025-"
}
We make some variables for memory, CPU core count, the path of the IP information file, and VM ids. abspath() has to be called on the var.ip_info_path to get the absolute path of where the file is to be placed. This must be done as the path will be used from multiple directories.
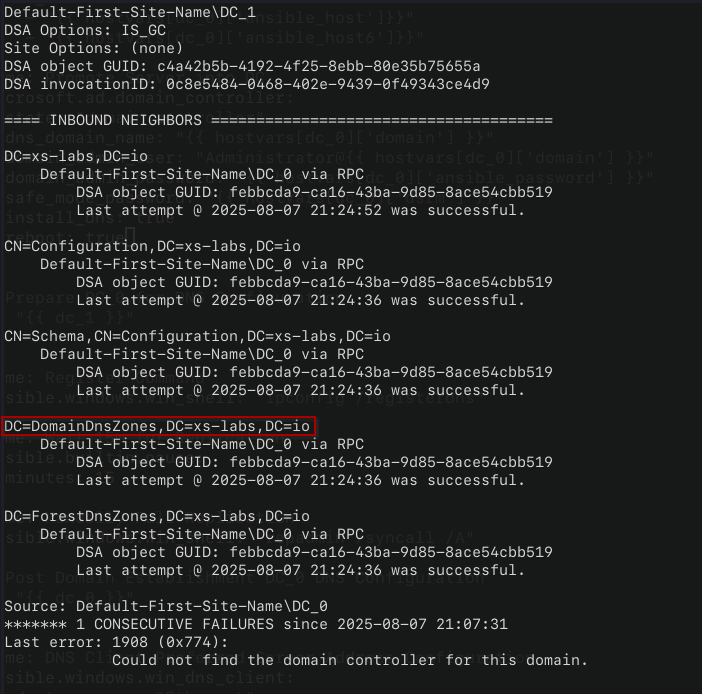
virtual_machines.tf will have to be updated to use these values. Now running the deployment shouldn't result in any errors. After doing so, we run repadmin /showrepl over SSH on second DC to confirm there isn't any replication errors.
The first step to making a reproducible, automated home lab deployment is done at this point. Both domain controllers are up, and healthy, so now we can shift our focus from Terraform/Ansible. However, before doing that there is something important to note on the current state of our repository.
Whenever ansible-inventory --list is ran from the Ansible directory, you'll notice everything passed to the ansible_host resource is listed. This includes sensitive values. Where are these values stored at? Well, earlier in this post I stated "...Ansible is configured to read inventory information from Terraform."
What that actually means is that Terraform stores the inventory information in the terraform.tfstate file, and Ansible reads it in. Terraform state files store information regarding the current state of your infrastructure. Hashicorp advises that this file is encrypted at rest as it will contain sensitive values and/or information which could aide in attacker in reconnaissance or lateral movement.
Any time terraform apply/destroy/plan is ran, Terraform will first attempt to refresh the state. This is done by making API calls to verify the state file is still an accurate representation of the infrastructure. If any differences are detected then Terraform will update the state file. Additionally, any time the state file is updated, via a refresh or by deploying/destroying infrastructure, then the old version of the state file is stored in a terraform.tfstate.backup file.
By default, the state file is stored locally in the root of the project directory. This can be changed by configuring a backend. Terraform documentation states that "Backends store state in a remote service, which allows multiple people to access it." If you work with Terraform in a professional capacity with a team, is highly likely the backend would be configured to use a cloud storage service.
Since the *.tfstate.* files are sensitive, they should be added to your git-secret configuration so the they're encrypted when uploaded to the remote repository. This also brings into question the ip_info.json file as it's preferable that information is not left exposed as well. To remedy this, let's make some modifications to virtual_machines.tf
resource "local_file" "ip_info_file" {
  filename   = local.ip_info_path
  source     = local.ip_info_path
  depends_on = [proxmox_virtual_environment_vm.windows_2025_dc]

  lifecycle {
    ignore_changes = all
  }
}

resource "null_resource" "remove_ip_file" {
  depends_on = [null_resource.ansible_dc_promo_playbook]

  provisioner "local-exec" {
    command = "rm -f ${local.ip_info_path}"
  }
}
Using another null resource provisioner, we can simply delete the file after the playbook is finished executing. This does cause an issue however, as when you go to run terraform destroy Terraform will attempt to refresh the state first. It will detect the file is absent, and then throw an error.
A meta-argument, lifecycle, can be added to local_file.ip_info_file to resolve this issue. By specifying ignore_changes = all, Terraform can be configured to not update the resource, but it can still create/destroy it. With that addition, everything can be run quite smoothly and securely with with terrraform apply/destroy.
After running the deployment, I recommend SSHing into the second DC to ensure replication & DNS are working as expected. repadmin /showrepl can be used to confirm all partitions are replicating. You may see an error that says this at the bottom of the output:
******* 1 CONSECUTIVE FAILURES since 2025-08-07 21:07:31
Last error: 1908 (0x774):
            Could not find the domain controller for this domain.
This likely occurred before the DC registered its DNS records and can be safely ignored. Just make sure the timestamps on the successful replications confirms this.
To ensure DNS is working as expected, dcdiag /test:dns can be ran. If all goes well, then it should report that your domain has passed the DNS test.
There's the ADFS and ADCS servers to set up next, but first we're going to take a step back and focus on networking. It's for the best that we iron out the networking configuration further before things get more complex.
The full repository for this project can be found here.