MODERN ADMINISTRATION CRASH COURSE - 2
7/20/2025
Last time, we did all the required setup for Terraform, plus made the Windows VM template. In this post, we can get right into defining the HCL code to deploy the VMs.
To get started, we will need to utilize the proxmox_virtual_environment_vm resource from the bpg/proxmox provider. A Terraform resource "describes one more infrastructure objects, such as virtual networks, compute instances, or even DNS records." So, what must be done seems to be rather straight forward: refer, to the documentation for the resource, and write the configuration according to our needs.
Before we can do that, the terraform init command needs to be ran. To quote the documentation, this command "initializes a working directory containing Terraform configuration files. This is the first command you should run after writing a new Terraform configuration or cloning an existing configuration from version control. It is safe to run this command multiple times."
A .terraform directory will be created, downloads provider dependencies, and installs referenced modules. The init command technically does a few other things, but we can go over that at a later date.
Microsoft recommends having at least two domain controllers, most obviously for availability reasons, but additionally as it's become convention to split the flexible single master operation (FSMO) roles between domain controllers. Deploying multiples of the same resource in Terraform can be accomplished via the count meta-argument. If you set it to 2, then 2 of those resources will deployed.
Here's what the declaration for the VMs looks like, which will be placed in a new virtual_machine.tf file:
resource "proxmox_virtual_environment_vm" "windows_2025_dc" {
  count       = 2
  name        = "terraform-windows-2025-${count.index}"
  description = "Terraform managed domain controllers"
  node_name   = "pve0"

  vm_id = count.index + 200
  bios  = "ovmf"

  clone {
    vm_id = 105
    full  = false
  }

  cpu {
    cores = 3
    type  = "host"
  }

  agent {

    enabled = true
  }

  stop_on_destroy = true


  memory {
    dedicated = 4048
    floating  = 4048
  }

  network_device {
    bridge   = "vmbr0"
    model    = "virtio"
    enabled  = true
    firewall = true
  }

}
HCL (Hashicorp Configuration Language) is the language terraform files are written in. In my opinion, it's fairly straightforward to read, and in our case, nearly all of the fields directly correspond to Proxmox options. As you can see, CPU, memory, network, BIOS, and the target node to deploy these on are specified.
Terraform resources cannot share a name, and Proxmox virtual machines cannot share the same ID. count.index can be referenced to introduce dynamic names and IDs. The two resources we deploy will end up being named terraform-windows-2025-0 and terraform-windows-2025-1.
Note: Count is one of five meta-arguments. These arguments are available on every resource and control the behavior of resources instead of describing the infrastructure itself.
├── .git
├── .terraform
├── bin
│   └── proxmox_terraform_setup.sh
├── dc_unattend.xml
├── flake.lock
├── flake.nix
├── outputs.tf
├── providers.tf
├── secrets.auto.tfvars
├── variables.tf
├── versions.tf
└── virtual_machines.tf
At this point, the local repository structure should look like this we can do a test deployment to ensure everything is working. To preview what changes will be made, we can run terraform plan. It compares the current configuration to be deployed to the prior state, showing you a diff between the two. It is not necessary to run terraform plan before running the actual deployment, but you should be aware it is an option.
To actually execute the deployment, run terraform apply. This will show you a diff, akin to the output of terraform plan, but it will then require the explicit input of "yes" for confirmation.
❯ terraform apply

Terraform used the selected providers to generate the following execution plan. Resource actions are
indicated with the following symbols:
  + create

Terraform will perform the following actions:

  # proxmox_virtual_environment_vm.windows_2025_dc[0] will be created
  + resource "proxmox_virtual_environment_vm" "windows_2025_dc" {
      + acpi                    = true
      + bios                    = "ovmf"
      + description             = "Terraform managed domain controllers"
      + id                      = (known after apply)
      + ipv4_addresses          = (known after apply)
      + ipv6_addresses          = (known after apply)
      + keyboard_layout         = "en-us"
      + mac_addresses           = (known after apply)
      + migrate                 = false
      + name                    = "terraform-windows-2025-0"
      + network_interface_names = (known after apply)
      + node_name               = "pve0"
      + on_boot                 = true
      + protection              = false
      + reboot                  = false
      + reboot_after_update     = true
      + scsi_hardware           = "virtio-scsi-pci"
...[truncated output]
As you may notice, certain values which were not configured are present here in the plan before execution. Many resources have required and optional values. Some optional values are completely omitted if not configured, and others, like many of them in proxmox_virtual_environment_vm, have default values if not configured. This is fine, but I thought I'd explicitly mention this to help reduce potential confusion.
Do you want to perform these actions?
  Terraform will perform the actions described above.
  Only 'yes' will be accepted to approve.

  Enter a value: yes

proxmox_virtual_environment_vm.windows_2025_dc[0]: Creating...
proxmox_virtual_environment_vm.windows_2025_dc[1]: Creating...
proxmox_virtual_environment_vm.windows_2025_dc[1]: Still creating... [00m10s elapsed]
proxmox_virtual_environment_vm.windows_2025_dc[0]: Still creating... [00m10s elapsed]
proxmox_virtual_environment_vm.windows_2025_dc[0]: Still creating... [00m20s elapsed]
proxmox_virtual_environment_vm.windows_2025_dc[1]: Still creating... [00m20s elapsed]
proxmox_virtual_environment_vm.windows_2025_dc[0]: Creation complete after 29s [id=200]
proxmox_virtual_environment_vm.windows_2025_dc[1]: Creation complete after 29s [id=201]

Apply complete! Resources: 2 added, 0 changed, 0 destroyed.
After confirmation, we can see terraform begins reaching out to Proxmox to execute the deployment plan. Terraform does not provide much information as to the specifics of what it is doing during this period, which isn't great if you are trying to debug a provider.
In case you need further insight into what the providers are doing during execution, the TF_LOG environmental variable can be set to DEBUG. There are multiple valid debug levels which can be passed to TF_LOG: TRACE, INFO, WARN, and ERROR. The output can be quite verbose, but thankfully the debug output can be streamed into a file instead of the console by passing a path to the TF_LOG_PATH environmental variable.
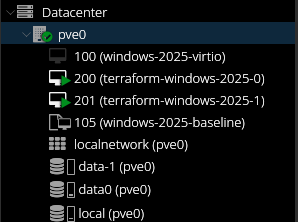
Once the deployment signals it has completed, we can validate the creation of the VMs in the Proxmox GUI:
Alternatively, the status of the VMs can be checked via the QEMU Machine command by running qm list on the Proxmox node:
root@pve0:~ qm list
      VMID NAME                     STATUS     MEM(MB)    BOOTDISK(GB) PID
       100 windows-2025-virtio      stopped    4096       32.00        0
       105 windows-2025-baseline    stopped    4096       32.00        0
       200 terraform-windows-2025-0 running    4048       32.00        2073758
       201 terraform-windows-2025-1 running    4048       32.00        2073759
All seems to have went well with the deployment. The next essential step to begin the automated configuration of these VMs is collecting the IP addresses from them. The proxmox_virtual_environment_vm resource exposes a ipv4_addresses attribute to make collecting this information trivial, at least in theory.
Run terraform destroy, which will stop and then delete the VMs which were just spun up. This will show the same diff and ask for the same input as terraform apply.
Plan: 0 to add, 0 to change, 2 to destroy.

Do you really want to destroy all resources?
  Terraform will destroy all your managed infrastructure, as shown above.
  There is no undo. Only 'yes' will be accepted to confirm.

  Enter a value: yes

proxmox_virtual_environment_vm.windows_2025_dc[0]: Destroying... [id=200]
proxmox_virtual_environment_vm.windows_2025_dc[1]: Destroying... [id=201]
proxmox_virtual_environment_vm.windows_2025_dc[0]: Destruction complete after 3s
proxmox_virtual_environment_vm.windows_2025_dc[1]: Destruction complete after 3s

Destroy complete! Resources: 2 destroyed.
With the prior VMs destroyed, we can now try to output ipv4_addresses data to the console by adding an output value to virtual_machines.tf. The documentation states output values "make information about your infrastructure available on the command line, and can expose information for other Terraform configurations to use. Output values are similar to return values in programming languages."
output "ip_addrs" {
  value = proxmox_virtual_environment_vm.windows_2025_dc[*].ipv4_addresses
}
Outputs are syntactically simple, requiring to be assigned a value and named. proxmox_virtual_environment_vm.windows_2025_dc is an array, which means the splat operator ([*]) is needed to extract the ipv4_addresses attribute from all the instances. With this new addition, running the deployment outputs the list of IP addresses to the console.
Apply complete! Resources: 2 added, 0 changed, 0 destroyed.

Outputs:

ip_addrs = [
  tolist([
    tolist([
      "169.254.42.136",
    ]),
    tolist([
      "127.0.0.1",
    ]),
  ]),
  tolist([
    tolist([
      "169.254.155.147",
    ]),
    tolist([
      "127.0.0.1",
    ]),
  ]),
]
Immediately, this does not look right, and for multiple reasons. Assuming a default Proxmox network configuration, each VM should be assigned an address directly from the ISP gateway device within your home. 169.254.x.x type addresses are link-local addresses. When DHCP fails, or is absent, machine's automatically configure themselves with an address with this network prefix in an attempt to secure communications. It's basically a reserved network segment strictly for machines which were not assigned an IP address.
This insinuates a failure of some sort has occurred. However, when viewing the network information for one of the VMs in the Proxmox GUI, we can see that is not the case.
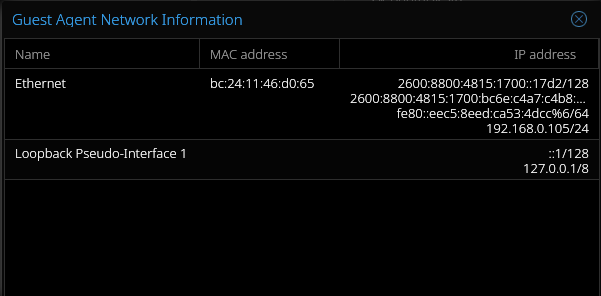
terraform-windows-2025-0 was assigned a valid address of 192.168.0.105. So, what's the issue here? This may be due to my gateway taking an unexpectedly long time to assign an address to the VMs. It could be that the implementation of the QEMU guest agent on Windows takes too long to share its IP, as the service seems to restart itself after being active for a bit before reporting. Perhaps the bpg/proxmox provider's implementation is wholly to blame. Either way, going down the rabbit hole of troubleshooting this issue could quickly turn into its own post. Thankfully, there is an alternative.
Terraform does provide the spackle which can be used to fill in the cracks of your automation pipeline. This comes in the form of provisioners. They allow an admin to execute arbitrary code locally, remotely, or place files. We'll be using the local-exec provisioner. Their use is heavily discouraged as they exist outside of Terraform's scope of management. Once again, to quote the documentation:
"...they also add a considerable amount of complexity and uncertainty to Terraform usage. Firstly, Terraform cannot model the actions of provisioners as part of a plan because they can in principle take any action."
So, they must be used carefully, and sparingly. To solve this network information collection issue, we'll write a script that will use Proxmox's API to wait for a valid address. This script will be ran once per VM as provisioners are tied to singular instance of a resource, so we'll need to keep that in mind. Under the bin/ directory, create a new file named get_network_info.sh.
Two parameters will be required for the script, the API token to authenticate to the node, and the ID of the VM to wait for. First, we'll reassign the script parameters to something more readable:
token="$1"
id="$2"
ip=""
cfg_file="$3"

echo "Awaiting IP for VM $id"
An empty $ip variable is declared and set to null. The strategy will be to periodically query the API until a valid address is returned.
while [ -z "$ip" ]; do
   ip=$(curl -s -k -H "Authorization: PVEAPIToken=$token" \
   "https://192.168.0.86:8006/api2/json/nodes/phv/qemu/$id/agent/network-get-interfaces" | \
   jq -r '.data.result[0]."ip-addresses"[3] | select(."ip-address-type" == "ipv4") | ."ip-address"')
   [[ ${ip:0:3} -eq 169 ]] && ip=""
   sleep 10
done

echo "Found VM $id IP: $ip"
Here, a while loop is used along with the test command ([ ]), utilizing the -z flag to continually check if $ip is null. Once a non-null value in $ip is detected at the start of the loop, it will break.
Inside of this loop, we use curl to query the API. The -s flag is to keep curl from producing console output before returning, -k tells curl to ignore SSL certificate errors (Proxmox default installations have a self-signed certificate), and -H is used to include a HTTP header to pass the API token in.
The Proxmox API will return this network information in JSON.
{
  "data": {
    "result": [
      {
        "statistics": {
          "tx-packets": 8424,
          "tx-errs": 0,
          "tx-dropped": 0,
          "tx-bytes": 1507904,
          "rx-dropped": 10995,
          "rx-bytes": 29595846,
          "rx-errs": 0,
          "rx-packets": 21904
        },
        "name": "Ethernet",
        "hardware-address": "bc:24:11:46:d0:65",
        "ip-addresses": [
          {
            "prefix": 128,
            "ip-address": "2600:8800:4815:1700::17d2",
            "ip-address-type": "ipv6"
          },
          {
            "ip-address-type": "ipv6",
            "prefix": 64,
            "ip-address": "2600:8800:4815:1700:bc6e:c4a7:c4b8:f47f"
          },
          {
            "ip-address-type": "ipv6",
            "ip-address": "fe80::eec5:8eed:ca53:4dcc%6",
            "prefix": 64
          },
          {
            "prefix": 24,
            "ip-address": "192.168.0.105",
            "ip-address-type": "ipv4"
          }
        ]
      },
      {
        "name": "Loopback Pseudo-Interface 1",
        "statistics": {
          "rx-bytes": 0,
          "rx-dropped": 0,
          "rx-errs": 0,
          "rx-packets": 0,
          "tx-packets": 0,
          "tx-errs": 0,
          "tx-bytes": 0,
          "tx-dropped": 0
        },
        "ip-addresses": [
          {
            "ip-address-type": "ipv6",
            "prefix": 128,
            "ip-address": "::1"
          },
          {
            "ip-address": "127.0.0.1",
            "prefix": 8,
            "ip-address-type": "ipv4"
          }
        ]
      }
    ]
  }
}
The data we want is nested pretty far into the object. This is where jq is useful. It's a very capable command, which can pretty print, parse, modify, and produce JSON. The downside is that it's power comes with a decent amount of complexity, as it uses a custom DSL for selecting and manipulating the data.
   ip=$(curl -s -k -H "Authorization: PVEAPIToken=$token" \
   "https://192.168.0.86:8006/api2/json/nodes/phv/qemu/$id/agent/network-get-interfaces" | \
   jq -r '.data.result[0]."ip-addresses"[3] | select(."ip-address-type" == "ipv4") | ."ip-address"')
After piping the curl output to jq -r, the return value is saved to $ip. The -r tells jq to output the selected data without JSON formatting.
Allow me to explain jq selector which follows the -r flag:
- .data.result[0] selects the first item in the array of result objects, under the top level data object. The first item is the object representing the Ethernet adapter.
- ."ip-addresses[3]" selects the fourth item in the array of addresses under the Ethernet object, which always seems to the IPv4 address.
- | select(."ip-address-type" == "ipv4") | ."ip-address" the object is piped to a filter which makes sure it is of type ipv4 before returning the ip-address field.
With that bit of parsing done, [[ ${ip:0:3} -eq 169 ]] && ip="" checks the retrieved IP to make sure it is not a link-local address. If it is, then $ip is reset to null before sleeping for ten seconds, to ensure the loop continues.
Virtual machine IDs will need to be mapped to IP addresses before outputting this information to a file:
json=$(jq -n \
   --arg id "$id" \
   --arg ip "$ip" \
   '{id: $id, ip: $ip}')

exec 200>"/tmp/cb4f859c-6f30-4876-b4e4-6fe8def78fbe.lock"
flock -x 200
###
[[ ! -s "$cfg_file" ]] && echo "{}" > "$cfg_file"
jq  --argjson obj "$json" '.ip_addrs |= (if . then . else [] end) + [$obj]' "$cfg_file" > "${cfg_file}.tmp"
mv "${cfg_file}.tmp" "$cfg_file"
###
exec 200>&-
Pairing the IDs and IPs is fairly easy. The result is saved to $json. At first, the bash which follows may seem oddly complex for the simple operation of writing to a file. However, there is a reason for this.
Whenever Terraform begins to process a resource that produces multiple instances of itself, it processes the creation of those instances in parallel. This means our script for VM 200 and 201 will be running in parallel.
In order to ensure reliability, we can utilize a common OS mechanism, file locking:
- exec 200>"/tmp/cb4f859c-6f30-4876-b4e4-6fe8def78fbe.lock" creates a lock file at the specified path if it does not exist and assigns it a file descriptor of 200.
- flock -x 200 creates an exclusive file lock on whatever file is assigned the file descriptor of 200.
- exec 200>&- removes the exclusive lock on file descriptor 200.
As far as what occurs while the lock is held, the path inside $cfg_file is checked to see if there is a file there with a size over 0. If nothing is there, an empty JSON object is created there. jq is used to initialize a ip_addrs field if one does not exist, before appending the new $json object inside inside it, outputting it to a temp file, and then overwriting the IP address configuration file.
With that in place, the scripts should all wait their turn, before modifying the file. Inside of virtual_machines curl.tf, within the windows_2025_dc resource, a provision block can be added to execute the script for network information collection.
resource "proxmox_virtual_environment_vm" "windows_2025_dc" {
  count       = 2
  name        = "terraform-windows-2025-${count.index}"
  description = "Terraform managed domain controllers"
  node_name   = "pve0"

...

  provisioner "local-exec" {
    command = "./bin/get_network_info.sh ${var.api_token} ${count.index + 200} ./configuration/ip_info.json"
  }

}
Inside of the local-exec curlprovisioner, the script can be set to run for the resource(s). When the deployment is ran, this will produce a file with the desired information, but that's not quite good enough. This file, and it's management, now fall outside of the the automation pipeline. Let's see how we can bring the file under the management of the pipeline.
Ideally, whenever terraform destroy is ran, the ip_info.js file will also be destroyed. This can be accomplished with local_file resource, which is within the Hashicorp provider namespace.
Terraform will implicitly add the hashicorp/local to the .terraform.lock.hcl file when used in our deployment, but it should be added to versions.tf to ensure reproducibility. The .terraform.lock.hcl file is what keeps track of dependencies within a Terraform project.
Beneath the proxmox_virtual_environment_vm declaration, we can add the following:
resource "local_file" "ip_info" {
  filename   = "./configuration/ip_info.jso"
  source     = "./configuration/ip_info.jso"
  depends_on = [proxmox_virtual_environment_vm.windows_2025_dc]
}
Per the documentation, the purpose of this resource type is to "Generate a local file with the given content." filename specifies the file we want to create. To specify what the file will contain, there is three mutually exclusive arguments, source, content, or content_base64. Seeing as we need to pass in a file, we will use the first option.
When the deployment is executed, ip_info.js will be produced from the script we wrote, this resource will read it in, and then overwrite it with the same content. This functionality is specified in the documentation for the filename argument for the resource.
Now, when the destroy command is ran, the file containing IP information will be destroyed as well. This is good, but the content of the file isn't accessible under local_file.ip_info. Designed primarily to manage file presence and location, the local_file resource does not expose the content of the file. In order to acess the contents, a data source block will be needed.
As for what data sources are, they "allow Terraform to use information defined outside of Terraform." This could be data held remotely by a cloud vendor, a local file on disk, and more. All we need to do is read a local file, which can be done this short addition:
data "local_file" "ip_info" {
  filename = local_file.ip_info.filename
}
There is a file() function which can also retrieve the contents of a file, but that would not work due to the file needing to be available during the plan phase of a Terraform deployment. There are four distinct phases that occur whenever terraform apply is ran.
- State Refresh: Refreshes the state of all managed resources by querying their status from the providers.
- Planning: Terraform generates an execution plan before presenting a summary of changes.
- Execution: Its a bit self-explanatory. The aforementioned plan is executed.
- State Update: New state is written to terraform.tfstate, and the old state is sent to moved to terramform.tfstate.backup.
By using a data source, Terraform will form a dependency link between data.local_file.ip_info and local_file.ip_info. Effectively, this allows us to read a file which will be available during the execution phase, even if Terraform cannot validate its existence during the generation of the execution plan.
By providing the path of the file to read, its contents will become available underneath the data namespace. We can now update the output block defined prior to finally yield the desired results.
output "windows_2025_dc_ip_addresses" {
  value = jsondecode(data.local_file.ip_info.content)
}
Let's go ahead and run the deployment and see what it returns.
Apply complete! Resources: 3 added, 0 changed, 0 destroyed.

Outputs:

windows_2025_dc_ip_addresses = {
  "ip_addrs" = [
    {
      "id" = "201"
      "ip" = "192.168.0.189"
    },
    {
      "id" = "200"
      "ip" = "192.168.0.145"
    },
  ]
}
Nice, it works as expected. Sadly, as the provisioners documentation warned, this injected a decent deal of complexity into the deployment. With that completed, we've managed to bring an arbitrary file under Terraform's control. Though this detour was unexpected, it provided a good opportunity to explore some additional facets of Terraform. As this post has gotten quite long, I'll go ahead and bring this to a close.
However, before ending this post, I'll be moving the windows_2025_dc_ip_addresses output block to it's own file, outputs.tf. I'm doing this mainly to keep things organized in anticipation of adding further outputs down the line.
So, that's all I have for now. I'll leave you with what the project directory should look like. Until next time, where'll start incorporating Ansible.
├── .git
├── .terraform
├── bin
│   ├── get_network_info.sh
│   └── proxmox_terraform_setup.sh
├── configuration
│   └── ip_info.js
├── dc_unattend.xml
├── flake.lock (if you are using nix)
├── flake.nix  (if you are using nix)
├── outputs.tf
├── providers.tf
├── secrets.auto.tfvars
├── terraform.tfstate
├── terraform.tfstate.backup
├── variables.tf
├── versions.tf
└── virtual_machines.tf