MODERN ADMINISTRATION CRASH COURSE - 1
7/18/2025
There are a lot of technologies for an admin to learn, especially if you'd like to be professionally versatile. Networking, infrastructure (as code), cloud providers, MDM platforms, and all of the minute details involved with running an Active Directory/Entra based environment. Naturally, this leaves one with the question on how to efficiently fit experience with all these technologies in- especially as the privilege of on the job training is a thing of the past.
What I personally opted for, as many do, is a home lab. One which will touch upon all of these things at once, or in time.
First, the focus will be on the work which would be done to support a company internally, then it will shift to the work would serve to support an external offering, such as a SaaS application.
As for the software choices, the following will be used:
- Type-I hypervisor: Proxmox, as it offers most of the features ESXi (ESXi is free to use for personal usage, so feel free to use that instead). We will start with one node, default install settings, and advance to clustering.
- Infrastructure automation: Terraform will handle the automation of deploying virtual machines to Proxmox.
- Configuration automation: Ansible will automate the configuration of the virtual machines deployed via Terraform.
Note: In this writing, I will be assuming the reader possesses some knowledge of operating systems, scripting, and virtualization.
Before we can get to setting up the domain controllers for AD, Proxmox will need to be configured for Terraform. In order to do this, we will need to configure the Terraform Provider for Proxmox, after installing the tools we need.
I am a proponent of Nix, so I will supply the development shell flake.nix that I will be using for this project here.
If you are not going to use Nix, then just know you'll want to install the following before proceeding:
- Python
- Ansible
- Terraform
- Terraform LSP
- sshpass
Once that is all installed, we'll make a new directory for this project, AD-IaC-Lab, and then git init && git branch -M main within the directory to setup the local git repository.
The documentation for Terraform providers states the following:
>Terraform relies on plugins called providers to interact with cloud providers, SaaS providers, and other APIs.
>Terraform configurations must declare which providers they require so that Terraform can install and use them. Additionally, some providers require configuration (like endpoint URLs or cloud regions) before they can be used.
So, we must refer to the documentation for the Proxmox provider to ascertain what needs to be done. There are a few options available for getting the provider to authenticate to our Proxmox instance, but we will use an API token as it is recommended for production systems.
There are instructions included in the aforementioned documentation for setting up an API token. We must add a PVE user for terraform to use, assign that user the permissions required to manage the environment, and finally create the API token for the terraform user.
In this series, we will strive to make all parts of this process reproducible. So, we will turn the instructions into a script that will be ran over SSH to automate the configuration:
proxmox_ip="$1"
ssh root@"$proxmox_ip" "bash -s" << "ENDSSH"


if ! dpkg -s uuid-runtime &>/dev/null; then
  apt update -qq &>/dev/null
  apt install -y uuid-runtime
fi

terraform_pwd=$(uuidgen)
terraform_pwd=${terraform_pwd:0:28}

pveum user add terraform@pve --password "$terraform_pwd"
useradd -m terraform

pveum user add terraform@pve --password "$terraform_pwd"
pveum role add Terraform -privs "Datastore.Allocate Datastore.AllocateSpace Datastore.AllocateTemplate Datastore.Audit Pool.Allocate Sys.Audit Sys.Console Sys.Modify SDN.Use VM.Allocate VM.Audit VM.Clone VM.Config.CDROM VM.Config.Cloudinit VM.Config.CPU VM.Config.Disk VM.Config.HWType VM.Config.Memory VM.Config.Network VM.Config.Options VM.Migrate VM.Monitor VM.PowerMgmt User.Modify"
pveum aclmod / -user terraform@pve -role Terraform


pveum user token add terraform@pve provider --privsep=0
printf "┌────────────────────────────────────────────────────────────────┐\n"
printf "│ Terraform SSH Password: $terraform_pwd                         |\n"
printf "└────────────────────────────────────────────────────────────────┘\n"

printf "IMPORTANT: These credentials will only be viewable once! Record them now!\n"
ENDSSH
This will produce two secrets; one will be the required API token, and the other will serve as password for the provider's Linux user account, so it may access Proxmox via SSH. Record the secrets, as they will be needed shortly.
There may be some confusion regarding why the provider requires SSH access, and why we create two accounts for terraform:
- a) The documentation states the provider may use access via SSH to "...execute commands on the node to perform actions that are not supported by Proxmox API."
- b) Proxmox has multiple authentication realms. The @pve realm is an entirely Proxmox managed form of authentication. Users within this realm are synced across all nodes in the cluster, and it lets Proxmox allow RBAC (role-based authentication). So, we create one account in the @pve realm and one normal Linux account, referenced as the @pam realm (PAM is the standard form of Linux authentication).
As stated before, the purpose of scripting this was so I would not have to manually do so if I had to set up a PVE instance again. This will need to be modified later to accommodate additional nodes. For now, let's make a bin/ directory and store our script in it.
At this point, we can begin writing the Terraform files. The structure of a Terraform project is flexible; there are no specific names you must use for .tf files. However, there are conventions, and we will be using them.
First, let us define a versions.tf file. Within the file, we will specify the the versions of the providers & of Terraform required to run the Terraform project. We will need the bpg/proxmox & ansible/ansible providers.
terraform {
  required_providers {
    proxmox = {
      source  = "bpg/proxmox"
      version = "0.76.0"
    }
    ansible = {
      version = "~> 1.3.0"
      source  = "ansible/ansible"
    }
  }
}
After that, we will define two important files: variables.tf & secrets.auto.tfvars. Just as the names suggest, we will be defining some sensitive variables in these files.
variable "api_token" {
  type      = string
  sensitive = true
}
variable "pve_ssh_passwd" {
  type      = string
  sensitive = true
}
variable "ve_endpoint" {
  type    = string
  default = "https://192.168.0.86:8006/"
}
Notehat we do not actually provide a value for api_token and pve_ssh_passwd. This is because we will be providing the definition in a** separate file, secrets.auto.tfvars (.tfvars are variable definition files).
api_token = "xxxxxxxx"
pve_ssh_passwd = "xxxxxxxx"
The actual definitions are separated into secrets.auto.tfvars so that we may encrypt our secrets while they are at rest. When we upload our repository into GitHub, we want to have our secrets encrypted without obfuscating the logic of our Terraform deployment.
Additionally, there is a reason for the .auto in the filename. If we just defined a secrets.tfvars and left the .auto out, then Terraform would not automatically load the variable definition file whenever we ran our deployment. This prevents us from having to append -var-file=secrets.tfvars every time we run terraform apply.
In an enterprise environment, secrets would need to be secured without inhibiting collaboration, so a secrets manager such as Hashicorp Vault would be used to inject the secrets at runtime.
However, since there is no need for collaboration, I will personally be using gpg with a Yubikey to handle the encryption of my files via some scripts I made. I recommend using git-secret, as I will be using something very similar.
Now that we have our secrets defined, and secured, we can make our providers.tf file. The purpose of this file is to define config info for the providers which require configuration.
provider "proxmox" {
  endpoint  = var.ve_endpoint
  api_token = var.api_token
  insecure  = true
  ssh {
    username = "terraform"
    password = var.pve_ssh_passwd
  }
}
As you can see, the variables we defined in variables.tf are accessible under the var namespace. The insecure option is set to true due to the self-signed TLS certificate Proxmox uses by default.
We are just about ready to deploy VMs, but since we are deploying Windows VMs, there is quite a few additional steps to fully automate this. A Windows VM will have to be deployed, prepared, and then sysprep'd.
At this point, our project directory should have the following structure:
├── bin
│   └── proxmox_terraform_setup.sh
├── flake.nix
├── secrets.auto.tfvars.gpg
├── providers.tf
├── variables.tf
└── versions.tf
If you have ever automated a the deployment of Windows endpoints or servers, then you're aware we will need to prepare an answer file, commonly named unattend.xml file, and feed it to a Windows image. For the uninitiated, the purpose of an answer file is to provide answers to the various prompts for input during a Windows installation.
This will be one of the stints of manual work that needs to be done to get the automation ball rolling.
To get started, we will need two ISOs: the Windows server 2025 & VirtIO ISO. We'll go ahead and make a new VM in Proxmox. I'll assign it an ID of 105. After that we need to specify that the VirtIO ISO should be attached:
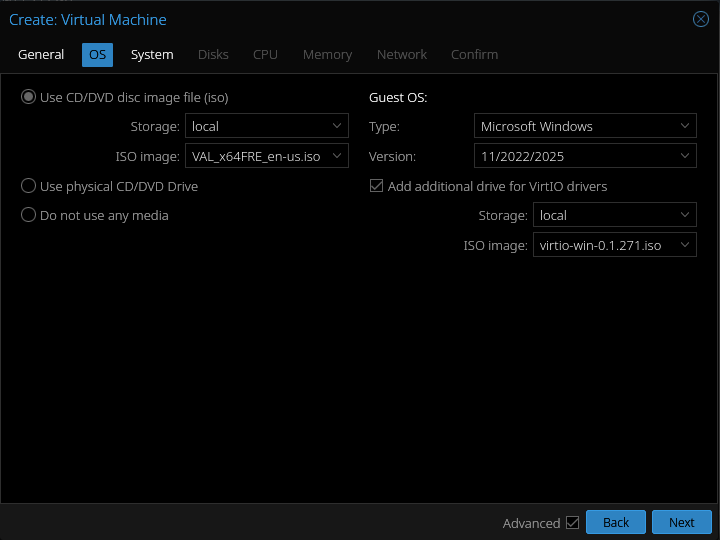
Over in the system section, we'll set SCSI controller to VirtIO SCSCI single, BIOS to OVMF, and set the EFI/TPM storage to our LVM-thin volume.
In the disks section, I recommend keeping the secondary storage for the virtual machine on the same volume as EFI/TPM for now. Next, in the CPU section, I bump the cores up to 2 & set the type to host as we do not have a multi-node cluster at this point. Setting the type to host exposes all the host machine's CPU features to the virtual machine, so it's generally recommended for single-node setups (or VMs which will only run on one node).
Lastly, make sure VirtIO is selected for model under the Network section & at least 4GB is allocated for memory. After that, we can fire up the VM. Hop into the console tab as it starts so we can interact with it. It's going to force you to press "any key" as it starts up, then the installation menu should appear.
At some point, the installer will ask us to select a Windows server 2025 version. I am going to go with the standard evaluation desktop experience, as I enjoy having the option to poke around the GUI in my home labs.
When it comes time to select a disk for the OS to be installed on, you'll notice there are none available. This is where the VirtIO drivers will have to be loaded, three of them to be exact. Click "load driver" and then "browse". Under the attached virtio ISO, load the following:
- viosci\2k25\amd64
- vioserial\2k25\amd64
- NetKVM\2k25\amd64
Note* When installing the vioserial driver, you may have to un-check the box which hides incompatible drivers. This is likely due to Windows not detecting a device which could currently utilize the driver.
Once those are installed, we can continue the installation as normal then set the administrator password as normal.
The "official" method to creating the unattend.xml file is to install the Windows ADK (assessment and deployment kit), and use the included Windows SIM (system image manager) tool. There tools out there which makes this process a lot less cumbersome, but we'll be sticking to the Microsoft tools for this post.
If you're running Linux, then it'll be most convenient to do this step on the VM we just created.
Upon opening up the Windows SIM, we first need to feed in the install.wim from our Windows server installation media by clicking File -> Select Windows distribution image. The install.wim file should be under located within the ISO at SSS_X64FREE_EN-US_DV9\sources\install.wim.
If you are doing this on the VM, then you will need to copy the wim file to another directory first, as the Windows SIM will not be able to read it off the mounted ISO. After feeding in the wim, it will take awhile as the catalog file is generated. The "Windows Image" pane should populate once it is done and we can begin to customize the answer file.
To get started, click File -> New Answer File.

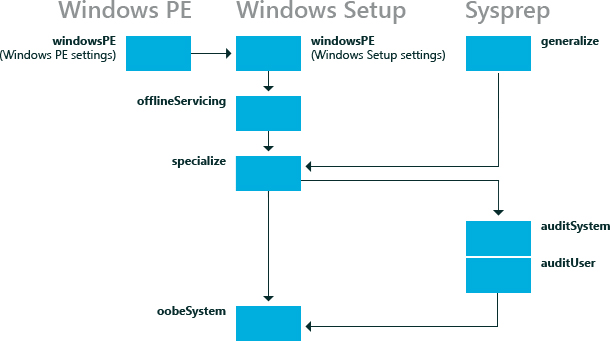
This is what should populate the Answer File pane. They are numbered 1 through 7 as these are the steps which will sequentially occur during or after a Windows installation, for the most part.
- windowsPE: This is the Windows pre-installation pass. Configuration inserted here will dictate disk configuration, language settings, product key activation, and things of the like.
- offlineServicing: Used to add drivers, language packs, and updates to the image directly. This has the benefit of allowing the drivers to be managed via DISM.
- generalize: Applied when sysprep is ran on the image.
- specialize: Runs after first boot and allows you to configure the network, hostname, time zones, and locale settings.
- auditSystem: Runs under the nt\system context whenever booted into audit mode, before any user logs on.
- auditUser: Same as auditSystem, however it runs under the context of of the built-in administrator account.
- oobeSystem: Settings to be applied to Windows before the Windows Welcome starts. Typically used to configure shell options, user accounts, languages, and the locale.
For our purposes, we will only need to add components to four of these configuration passes. The only requirements are for it to be fully automated and for it to persist the drivers present on the OS at time sysprep is run.
Two components will need to be added to the windowsPE pass. Microsoft-Windows-Setup and Microsoft-Windows-International-Core-WinPE. First, we will configure the prior.
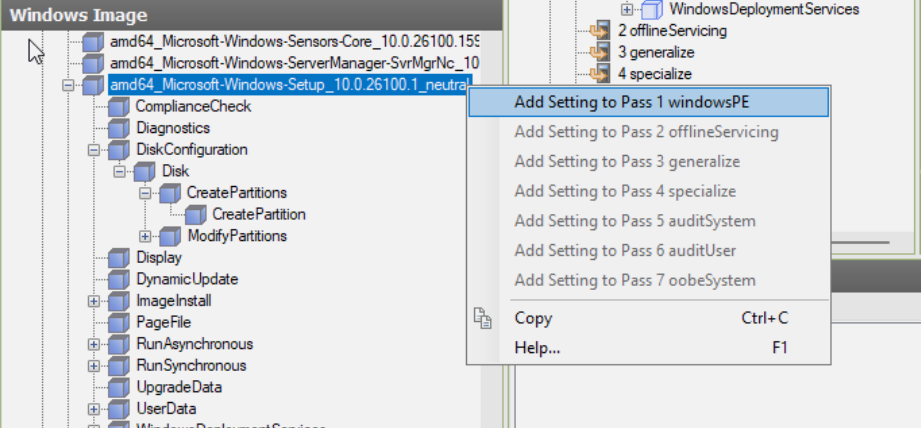
Components and sub-components can be right-clicked to add them to compatible passes. They will then appear in the answer file pane, where they can be clicked on, then configured. After adding Microsoft-Windows-Setup, Microsoft-Windows-Setup\DiskConfiguration\CreatePartitions will need to be added:
- Extend: Specifies whether to extend partition to fill the disk. Set this to true.
- Order: Specifies the order order for multiple partitions. Even though we will only have one partition, this is required. Set this to 1.
- Type: Specifies the type of partition to create. Set this to primary.
Microsoft-Windows-Setup\DiskConfiguration\ModifyPartition is the next required sub-component:
- Format: Defines the file-system for the partition. Set this to NTFS.
- Extend, Order, PartitionID: Set extend to true & others to 1.
- Active: Specifies whether the partition is active. Set this to true.
There's a few more under this component:
Microsoft-Windows-Setup\DiskConfiguration requires DiskID to be set to 1 and WillWipeDisk set to true.
Microsoft-Windows-Setup\ImageInstall\OSImage needs InstallToAvailablePartition set to true.
Microsoft-Windows-Setup\UserData\ has an AcceptEula field which must be set to true. There is two other fields which should be filled out as well.
That is the last of what is required within the windowsPE pass. Next would be the specialize pass, which we'll need to add two components to. If you're following along, then you should be familiar with the UI of the Windows SIM by now, so I'll just include the corresponding XML going forward.
<component name="Microsoft-Windows-International-Core" processorArchitecture="amd64" publicKeyToken="31bf3856ad364e35" language="neutral" versionScope="nonSxS" xmlns:wcm="http://schemas.microsoft.com/WMIConfig/2002/State" xmlns:xsi="http://www.w3.org/2001/XMLSchema-instance">
	<InputLocale>en-US</InputLocale>
	<SystemLocale>en-US</SystemLocale>
	<UILanguage>en-US</UILanguage>
	<UILanguageFallback>en-US</UILanguageFallback>
	<UserLocale>en-US</UserLocale>
</component>

<component name="Microsoft-Windows-Shell-Setup" processorArchitecture="amd64" publicKeyToken="31bf3856ad364e35" language="neutral" versionScope="nonSxS" xmlns:wcm="http://schemas.microsoft.com/WMIConfig/2002/State" xmlns:xsi="http://www.w3.org/2001/XMLSchema-instance">
	<TimeZone>UTC</TimeZone>
	<ComputerName>*</ComputerName>
</component>
In the generalize pass, one field needs to be set to persist drivers installed to the reference machine.
<component name="Microsoft-Windows-PnpSysprep" processorArchitecture="amd64" publicKeyToken="31bf3856ad364e35" language="neutral" versionScope="nonSxS" xmlns:wcm="http://schemas.microsoft.com/WMIConfig/2002/State" xmlns:xsi="http://www.w3.org/2001/XMLSchema-instance">
	<PersistAllDeviceInstalls>true</PersistAllDeviceInstalls>
</component>
The rest of the options will all be specified within the oobeSystem pass. Most if it is not noteworthy, mostly hiding more mundane locale and EULA prompts, except for Microsoft-Windows-Shell-Setup\UserAccounts\AdministratorPassword. This needs to be set and recorded for later, as it will be the default password used by Ansible to SSH into these machines for configuration.
<component name="Microsoft-Windows-Shell-Setup" processorArchitecture="amd64" publicKeyToken="31bf3856ad364e35" language="neutral" versionScope="nonSxS" xmlns:wcm="http://schemas.microsoft.com/WMIConfig/2002/State" xmlns:xsi="http://www.w3.org/2001/XMLSchema-instance">
	<OOBE>
		<HideEULAPage>true</HideEULAPage>
		<HideOEMRegistrationScreen>true</HideOEMRegistrationScreen>
		<HideWirelessSetupInOOBE>true</HideWirelessSetupInOOBE>
		<NetworkLocation>Work</NetworkLocation>
		<ProtectYourPC>3</ProtectYourPC>
	</OOBE>

	<UserAccounts>
		<AdministratorPassword>
			<Value>YourPasswordHere</Value>
			<PlainText>false</PlainText>
		</AdministratorPassword>
</UserAccounts>
</component>

<component name="Microsoft-Windows-International-Core" processorArchitecture="amd64" publicKeyToken="31bf3856ad364e35" language="neutral" versionScope="nonSxS" xmlns:wcm="http://schemas.microsoft.com/WMIConfig/2002/State" xmlns:xsi="http://www.w3.org/2001/XMLSchema-instance">
	<InputLocale>en-US</InputLocale>
	<SystemLocale>en-US</SystemLocale>
	<UILanguage>en-US</UILanguage>
	<UILanguageFallback>en-US</UILanguageFallback>
	<UserLocale>en-US</UserLocale>
</component>
Note: If you cannot enter special characters for the admin password due to noVNC not detecting the shift key, do not fret. The produced answer file can be edited in a text editor, as it's just XML. Just make sure to set <PlainText> to true when you do. All that option does is base64 encode your password, and we will be encrypting our answer file at rest anyways.
With that drab bit finished, save the final product by clicking File -> Save Answer File.
There is a a few more tasks to be done before the machine will be ready to sysprep. Our VMs will need to be able to report to Proxmox what IP address they're assigned. To fulfill this requirement, the QEMU guest agent will need to be installed. The installer can be found within the already mounted VirtIO ISO, under /guest_agent. Once that is done, install the available updates for the server, and then power down the VM.
After the VM is sysprep'd, it'll need to be turned into a template. All the Proxmox settings configured during VM creation, including attached ISOs, will be apart of the template. The ISOs will not need to be available moving forward, so they can be removed.
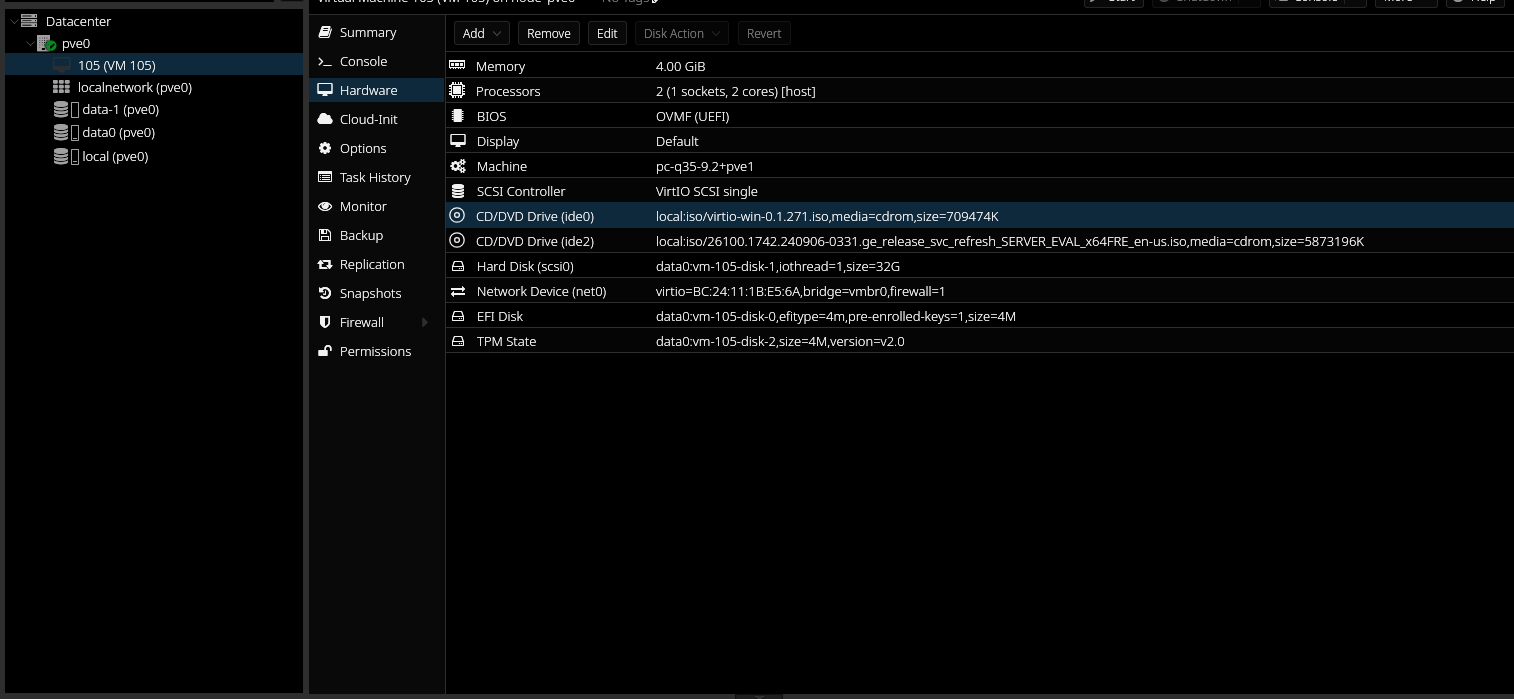
The QEMU guest agent needs to be enabled on the hypervisor host as well, so we'll enabled that on the soon-to-be template machine. It can be enabled underneath "Options" for the VM.
At this point, all that needs to be done is boot up the VM, cleanup if you installed the ADK directly onto it, and then sysprep it. However, before doing that, I recommend making a full clone of the VM in it's current state. I have observed difficulties with running sysprep on a VM again after it's been cloned from a template, and it'd be a shame to have to redo everything in the case something goes wrong.
With the backup VM created, the VM can be started back up again. Under the summary tab for the VM, network information should become available shortly after boot. Using this information, we can SSH into the machine to sysprep it. The answer file will be needed on the VM, and we'll want to keep a copy of it in the project repository. If you created the answer file on the VM, then SCP file into the local repository:
scp [OPTIONS] [[user@]src_host:]file1 [[user@]dest_host:]file2

scp Administrator@192.168.0.57:/Users/Administrator/Downloads/unattend.xml ./
After that, sysprep can be ran over SSH on the VM:
\Windows\System32\Sysprep\sysprep.exee /generalize /oobe /shutdown /unattend:unattend.xml
This command, over SSH, seems to do nothing, as nothing is returned and it does not even hang while it does its work. However, rest assured, sysprep has been kicked off in the background. In time, the VM should shut itself down.
All that's left to do is right-click the VM and convert it to a template, then we're done. Now we're ready to begin the automating the deployment of the domain, in the next post.